Dec 27th, 2009 Posted in Projects | Comments Off on Kids Projects
Here are a few fun things for the kids.
Coloring! Print out these black and white sheep illustrations and color them up. We’ll post them right here!
http://www.sheepusa.org/kids/clrsheep.shtml
prints courtesy of American sheep association
How to teach children to Knit
——————————————————————————–
Simple felting projects for kids
Felt Balls, flat felt, felt pocket, and felt cards
——————————————————————————–
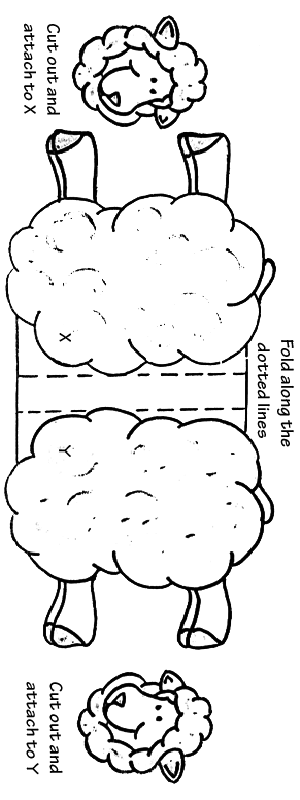
Make Your Own Paper Pet!
Follow these simple steps!
Print this page
Color your new Paper Pet
Carefully cut out the pet parts
Fold along the dotted lines
Use glue or tape to assemble

Dec 27th, 2009 Posted in Projects | Comments Off on Felt Projects for Kids
Felt Balls
Old panty hose are great for stuffing wool into to make felt balls. I have them use the cheap, unprocessed wool to make the inner part of the ball. They stuff this into the toe end of the hose and tie a knot after pushing the wool down firmly. They then dunk it in hot water and squirt on the soap gel (or dip it in the bucket of soap gel). Kids prefer the gel made from grating 1/4 bar of Ivory into a couple of quarts of hot water and stirring to dissolve. Cool and then use. It’s lovely and gushy. A wonderfully tactile experience for kids.
After they have the center of the ball somewhat felted, they cut the knot off and take it out of the hose. They then tie another knot so they can use the hose again. I have them lay out a circle of the merino in three layers of any colors they choose — it only takes about 1/4 ounce or less (unless they make a large ball — I’m talking tennis ball size or less). They then wrap the colored fiber around, adding colored yarn (not synthetic) if desired, and stuff it carefully back into the hose, tying yet another knot to secure the ball between the two knots. Push it in firmly so there is not room for the ball to shift around inside the hose. Rub until the fiber begins to creep through the hose and pill slightly on the outside of the hose. Don’t felt too much longer inside the hose, or it will be hard to detach the hose from the ball. Remove the ball and continue rubbing until well felted. Fulling (hardening) can be done by banging the ball on a hard surface (either inside or out of the hose) or by tossing it in the dryer with a load of clothes. If desired, a string or elastic can be wrapped around the inner core of the inner ball so that the finished ball is on a string or stretchy cord of elastic.
Flat felt
Flat felt is also a good project as long as you have good felting wool. Kids get frustrated if the end result takes too long or appears to be unsuccessful. They usually need some help with pulling off finer layers of fiber rather than thick clumpy pieces, so I have them practise grasping only the very end of the roving so that they only pull out some of the fibers at a time. They also learn to hold their hands a distance apart to make it easier to separate the fibers — so here we usually talk a little about the “staple” or length of the wool fiber and relate it to short or long haired dogs or cats. Merino has a fairly long staple, so they find they have to hold their hands at least 6-8″ apart. Have them lay down at least three layers of fiber, criss-crossing the layers. Encourage them to add a surface design. This can be done using knitting yarn (not synthetic), little wisps of contrasting colored fiber, pre-felt cutouts than you might bring along for them, small pieces of knitted fabric from old cut up sweaters etc. They can “write” their name with yarn or thin pieces of fiber. Don’t be suprised at their creativity!
Felt Pocket
Another project is to have them felt around a smallish round smooth rock (around the size of a medium baking potato). Again, I like to use the panty hose as it “contains” the fibers and avoids them rubbing a thin spot or hole so easily. Once the felting is mostly done, they can snip a “mouth” and remove the rock. This makes a little pouch shape. They need to massage the cut edges to close over and felt the loose fiber from the cut. If you have little “sew-on wiggle eyes”, this can produce a cute looking type of Muppet — especially if they have used a different color on the inside layers — so that their green “frog” can have a red “mouth” inside.
Felt Cards
Purchase cardstock paper or undecorated cards from a hobby store. Have children make flat felt using just two thin layers of fiber and some decorative surface items. Make pieces about 6″ x 4″ and iron flat to dry. Cut out a shape from the center of the card using a stencil. Cut the corresponding shape (only slightly larger) from the felt, and carefully glue to the inside of the front of the card, allowing the designed side to show through on the front. Seasonal colors can be selected for seasonal cards.

